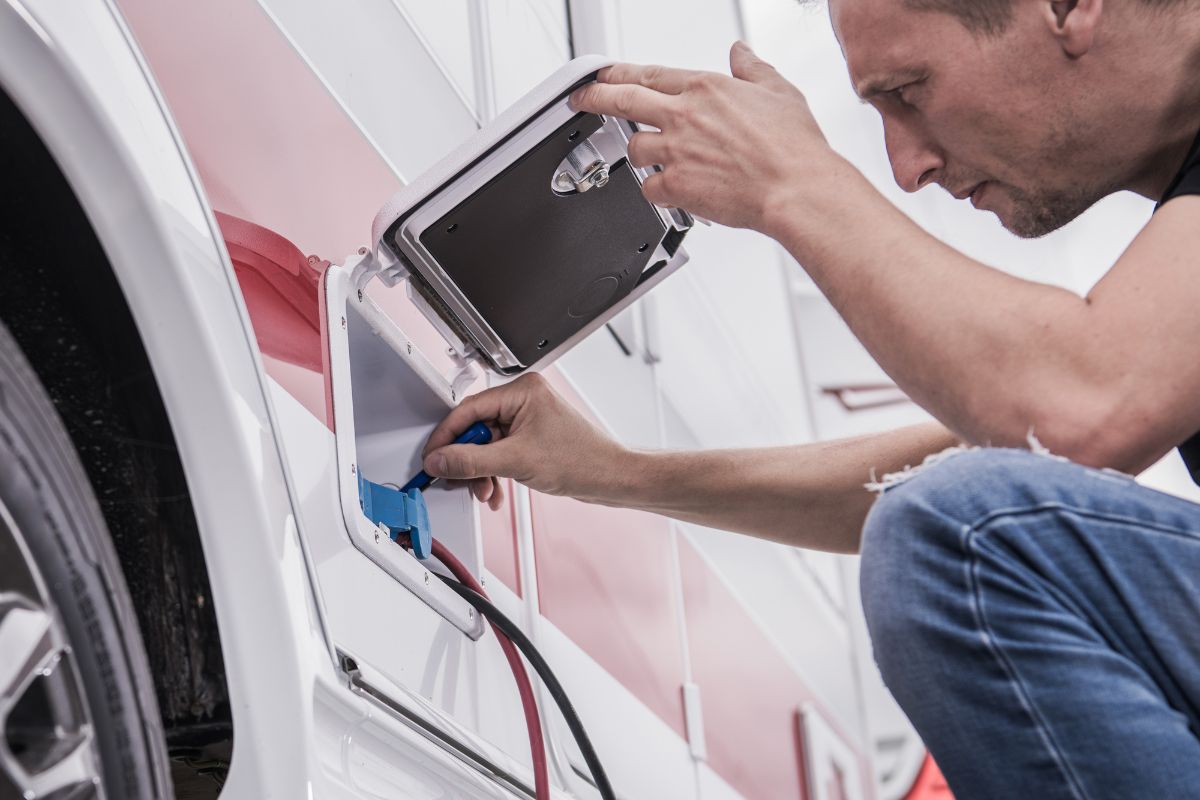
If you own an RV, you know how important it is to have access to reliable electrical power while on the road. Of course, knowing how to wire a 30 amp RV outlet makes a significant assurance to enjoy being outdoors.
Whether you’re camping in a remote location or simply parked in an RV park, having access to a 30 amp electrical hookup can make all the difference in your comfort and convenience.
While many RV parks and campgrounds offer 30 amp electrical hookups, there may be times when you need to wire your own outlet.
Perhaps you’re installing a new outlet in your driveway for easier RV access, or maybe you’re setting up a temporary campsite without access to electricity.
Whatever your reasons, knowing how to wire a 30 amp RV outlet on your own can be a valuable skill for any RV owner.
Wiring an RV outlet may seem like a daunting task, but with the right tools, materials, and instructions, it’s a project that can be completed by anyone with basic electrical knowledge.
In this guide, we’ll take you through the steps on how to wire a 30 amp RV outlet on your own.
We’ll cover everything from gathering the necessary materials to testing your finished outlet, so you can feel confident and safe throughout the entire process.
By the end of this guide, you’ll have the knowledge and skills you need to complete this project on your own, saving you money and giving you the satisfaction of a job well done.
So, let’s get started and learn how to wire a 30 amp RV outlet on your own!
What Is A 30 Amp RV Outlet?
Before knowing how to wire a 30 amp RV outlet, you must first know what is the said outlet. Well, a 30 amp RV outlet is an electrical outlet that is specifically designed to supply power to a recreational vehicle (RV) with a 30 amp electrical system.
The outlet itself typically consists of a standard three-pronged plug, similar to those found in most households, but with a dedicated ground pin and two hot pins that are rated for 30 amps of current.
In addition, the outlet is usually installed in a weatherproof box and connected to a dedicated circuit breaker in the main electrical panel, which is also rated for 30 amps.
In an RV, the 30 amp electrical system typically powers the air conditioning unit, refrigerator, water heater, and other appliances and devices.
It is important to note that not all RVs have 30 amp electrical systems; some may have 50 amp or even 15 amp systems, which require different outlets and wiring configurations.
So, if you’re planning to follow this guide on how to wire a 30 amp RV outlet on your own, it’s important to have a good understanding of electrical systems and safety practices.
Ultimately, following proper wiring procedures and using the correct materials and tools can help ensure a safe and reliable electrical connection for your RV.
How To Find Out Which Type Of Amp You Have
Along with learning how to wire a 30 amp RV outlet, you should find out which type of amp you have. To determine the type of amp you have, you will need to locate the manufacturer’s label or plate on the amplifier itself.
This label or plate should provide you with information about the amp, including the model number, wattage, and impedance.
The model number should give you an indication of the type of amp you have, such as a guitar amp, bass amp, or PA system amp.
Meanwhile, the wattage rating will give you an indication of the power output of the amp, which can range from as low as a few watts for a practice amp to several hundred watts for a large PA system.
On the other hand, the impedance rating will also be listed on the label or plate and is usually indicated by a number such as 4, 8, or 16 ohms.
This rating tells you the resistance of the speakers that the amp is designed to work with.
It is important to match the impedance rating of your speakers with that of your amp to ensure optimal performance and to prevent damage to either the amp or the speakers.
If you are unable to locate the manufacturer’s label or plate on your amp, you may be able to find information about the amp online by searching for the make and model number.
Many manufacturers provide specifications and manuals for their products online that can help you determine the type of amp you have.
What Materials Do You Need?
One of the necessary information you need to remember on learning how to wire a 30 amp RV outlet is that it requires specific tools and materials to ensure a safe and reliable connection.
Here are the materials you will need:
30 amp RV outlet: This is the specific type of outlet that is designed to supply power to your RV. Ensure you purchase an outlet that is suitable for outdoor use and is compatible with your RV’s electrical system.
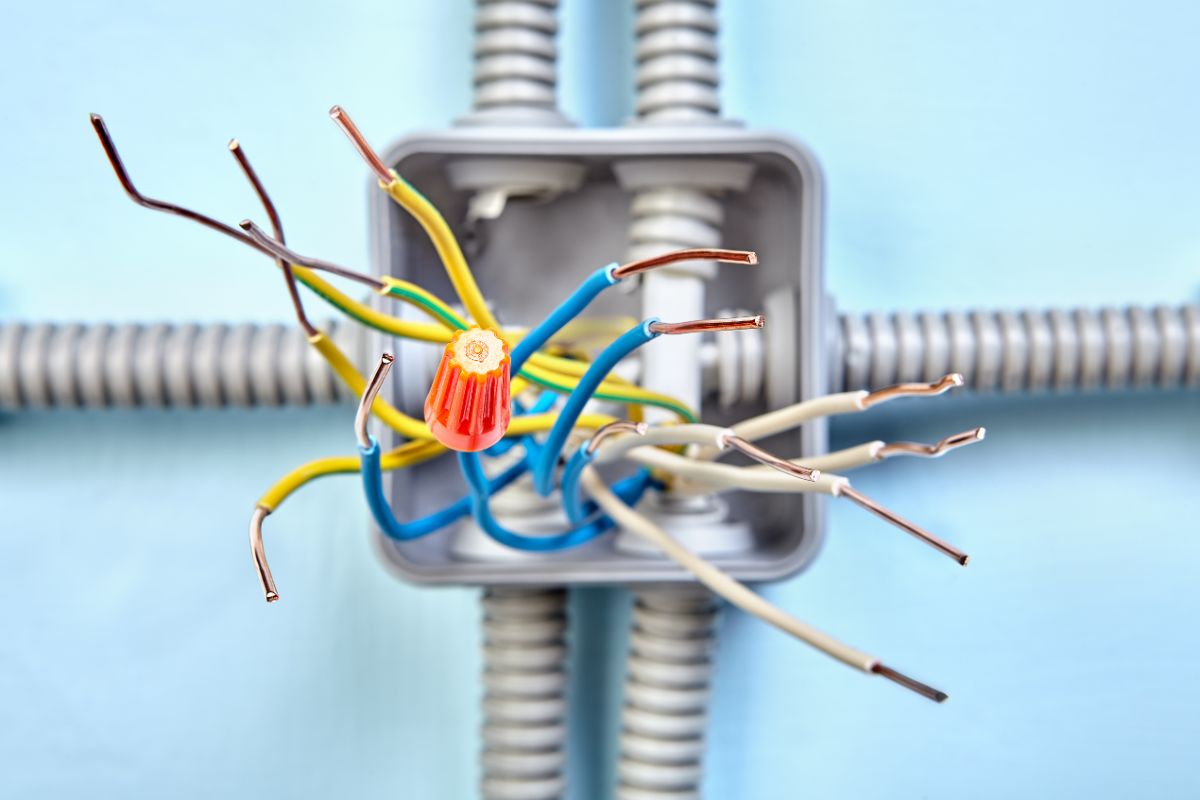
Electrical wire: You will need a length of electrical wire that is suitable for outdoor use and is the correct gauge for a 30 amp electrical system. The recommended wire size for a 30-amp circuit is 10 gauge copper wire. It is commonly sold in rolls or by the foot.
Circuit breaker: You will need a 30 amp circuit breaker that is compatible with your electrical panel. Make sure to turn off the power to the panel before installing the breaker.
Electrical box: You will need an electrical box to house the outlet and wiring connections. The box should be rated for outdoor use and be large enough to accommodate the outlet and wiring.
Wire connectors: You will need wire connectors, such as wire nuts or crimp connectors, to join the wires securely. Use connectors that are rated for the wire gauge you are using.
Electrical tape: Electrical tape can be used to wrap the wire connections and provide additional insulation and protection.
Tools: You will need a few tools to complete the project, including wire strippers, pliers, screwdrivers, a wire cutter, a voltage tester, and a drill with a hole saw attachment.
Tools Checklist
Wiring a 30 amp RV outlet requires specific tools to ensure a safe and successful installation.
Here is a list of tools you will need:
Wire strippers: Wire strippers strip the insulation from the wire ends.
Pliers: Pliers are used to hold the wires while you are working on them, as well as to bend and shape the wires as needed.
Screwdrivers: You will need both flathead and Phillips screwdrivers to remove and install screws.
Wire cutter: A wire cutter is used to cut the electrical wire to the correct length.
Voltage tester: A voltage tester ensures that the power is turned off before you start.
Drill with hole saw attachment: A drill with a hole saw attachment is used to create a hole in the wall or surface where you will be installing the outlet.
Fish tape: A fish tape is a long, flexible tool used to guide the wire through the wall or surface.
Circuit tester: A circuit tester is used to test the outlet and make sure it is properly wired and grounded.
Electrical tape: Electrical tape can be used to wrap the wire connections and provide additional insulation and protection.
Safety equipment: It is important to wear safety equipment, such as safety glasses and work gloves, when working with electrical wiring.
How to Wire a 30 Amp RV Outlet: Step-By-Step Instructions
Wiring a 30 amp RV outlet can be a daunting task, but with the right materials, tools, and instructions, it is a straightforward process.
Here are step-by-step instructions on how to wire a 30 amp RV outlet:
1. Turn Off The Power
Before beginning any electrical work, switch off the power in the area where you will be installing the outlet.
This can be done by flipping the circuit breaker that controls the area.
2. Choose A Location
The next step on how to wire a 30 amp RV outlet is to decide on a location for the outlet. Make sure it is easily accessible and provides enough clearance around the outlet.
More importantly, ensure the location is also easily accessible to the main electrical panel.
3. Install The Electrical Box
Install the electrical box in the chosen location using screws and a screwdriver.
Make sure the box is properly anchored to the wall or surface and is level.
4. Drill A Hole
Use a drill with a hole saw attachment to create a hole in the wall or surface where the outlet will be installed. Make sure the hole is the correct size for the outlet.
5. Install The Outlet
Attach the wires to the back of the outlet according to the manufacturer’s instructions.
Typically, you will connect the black wire to the brass terminal, the white wire to the silver terminal, and the green or bare wire to the green terminal.
Tighten the screws securely.
6. Connect The Wires
Use wire nuts or crimp connectors to connect the wires from the outlet to the electrical wire coming from the main electrical panel.
Make sure to match the wire colors correctly.
7. Install The Circuit Breaker
Install the 30-amp circuit breaker in the main electrical panel, making sure to turn off the power to the panel first.
Connect the wire coming from the RV outlet to the circuit breaker.
8. Test The Outlet
Turn the power back on and use a circuit tester to test the outlet and ensure it is wired correctly and grounded.
Follow the procedure outlined below to test your outlet effectively.
9. Secure The Outlet
Once you have tested the outlet and confirmed that it is working properly, secure the outlet to the electrical box using screws and a screwdriver.
Remember to follow proper electrical wiring procedures and safety practices when working on any electrical project.
If you are uncertain about any steps on this guide on how to wire a 30 amp RV outlet, consult a licensed electrician.
RV Outlet Testing Procedure
Testing your RV outlet is an important step in ensuring that it is properly wired and grounded. Here is how to test your outlet:
1. Switch Off The Power
Switch off the power for the area where the outlet is installed by flipping the circuit breaker.
2. Use A Voltage Tester
Use a voltage tester and check that there is no power present at the outlet.
Touch one lead of the voltage tester to the hot wire and then touch the other lead to the ground wire.
The voltage tester should not beep or light up. If it does, there is still voltage present and the power needs to be turned off again.
3. Check The Polarity
Use a polarity tester to check that the wires are properly connected to the outlet. Insert the tester into the outlet and check the reading.
The tester should indicate that the hot wire is connected to the brass terminal, the neutral wire is connected to the silver terminal, and the ground wire is connected to the green or bare terminal.
4. Test The GFCI
If your RV outlet has a built-in GFCI (ground fault circuit interrupter), test it by pressing the test button.
The GFCI should trip and the power to the outlet should be turned off. Press the reset button to restore power to the outlet.
5. Test The Circuit
Plug in a test device, such as a lamp or radio, and turn it on. Check that the device is receiving power and functioning properly.
6. Check For Overheating
After the test device has been plugged in for a few minutes, check the outlet for signs of overheating, such as a burning smell or discolored outlet.
If you notice any signs of overheating, turn off the power to the outlet and contact a licensed electrician.
Remember, if you are unsure about any aspect of testing your outlet, it is always best to consult a licensed electrician.
Safety Precautions
Wiring a 30-amp RV outlet involves working with electricity, which can be dangerous if proper safety precautions are not taken.
Follow this safety advice to prevent any accidents:
Turn off the power: Always turn off the power to the area where you will be working by flipping the circuit breaker that controls the area. This will prevent electric shock.
Use protective gear: Make sure that you wear safety glasses, gloves, and non-conductive shoes to protect yourself from electrical hazards.
Use the right tools: Use only tools that are specifically designed for electrical work and in good condition. Damaged or worn-out tools can be dangerous to use.
Follow the manufacturer’s instructions: Read and follow the manufacturer’s instructions for all materials and tools you are using. This will help ensure proper installation and safety.
Check for live wires: Always use a voltage tester to check for live wires before touching any electrical components. This will prevent electric shock.
Secure wires and cables: Make sure all wires and cables are securely fastened and kept away from sharp objects or edges. This will help prevent damage and electric shock.
Consult a licensed electrician: If you are unsure about any aspect of the installation process or have any questions about electrical safety, consult a licensed electrician. They can help ensure proper installation and safety. Remember, taking proper safety precautions when working with electricity is important for your safety and the safety of others.
Tips For RV Electrical Maintenance
Knowing how to wire a 30 amp RV outlet is one thing that is important part of owning an RV. Besides that, you also need to learn about RV electrical maintenance as it helps ensure that your electrical system is functioning properly and safely.
Check your batteries: Your RV’s batteries are an important component of your electrical system. Check the battery connections regularly to make sure they are clean and tight. Also, check the battery fluid levels and top off as needed.
Inspect your electrical cords: Inspect your RV’s electrical cords for any signs of wear or damage, such as cuts or frayed wires. Replace any damaged cords immediately.
Test your GFCI outlets frequently: GFCI (ground fault circuit interrupter) outlets are designed to protect against electric shock. Test your GFCI outlets regularly by pressing the test button and ensuring that they trip and cut off power to the outlet.
Check your circuit breakers: Check your RV’s circuit breakers regularly to ensure they are properly functioning. If a circuit breaker trips frequently, it may be a sign of an electrical problem that needs to be addressed.
Test your smoke detectors: Your RV’s smoke detectors are an important safety feature. Test them regularly to make sure they are properly functioning.
Inspect your electrical system: Have a licensed electrician inspect your RV’s electrical system periodically to ensure it is functioning properly and safely.
Keep your RV dry: Moisture can cause electrical problems in your RV. Keep your RV dry by repairing any leaks promptly and using a dehumidifier if needed.
Final Thoughts
By following the step-by-step instructions and safety precautions outlined in this guide, you have gained the knowledge and skills necessary on knowing how to wire a 30 amp RV outlet on your own.
Having a 30 amp RV outlet in your home or RV campsite can provide you with a reliable source of power for your RV, making your camping experience more enjoyable and convenient.
However, it is important to ensure that the outlet is wired properly and safely to prevent any electrical hazards. Safety should always be your top priority when working with electricity.
Always turn off the power before working on electrical components, wear protective gear, use the right tools, and consult a licensed electrician if you are unsure about any aspect of the installation process.
My name is Eddie, and I am an RV enthusiast! I have enjoyed traveling all my life, and want to give my family the same opportunities to see as much of the world as possible.
As I’ve gotten older, I’ve discovered how great RVs can be for vacations with a young family. Here at RV Lifestyle Experts, I want to share my experiences, the tips I’ve picked up along the way. I hope that our guides can encourage you to try the RV lifestyle. I promise you that you won’t regret it!


")


